How to add a video/audio in a DVD Menu background?
Posted: Wed Mar 26, 2014 1:23 pm
How to add a video or/and audio to your menu background with ConvertXtoDVD?
ConvertXtoDVD offers some great customization possibilities, like adding a video, picture and audio to your DVD menu. This makes your DVD not only pretty cool and unique, but very professional too!
ConvertXtoDVD offers more than 12 different menu templates, but only a few of them enables for this kind of customization. Simply follow these steps and you’ll soon be the king (or queen ) or cutom DVD menus!
The only trick is to determine which menu type will need to be customized according to your type of projects.
1. Projects with only one video.
If you only have one video in your project then you will need to customize the ROOT menu. That is the first menu shown when inserting the DVD.
You need to select between the “Black Mirror with video in top 1/3 of screen”, the “Glossy” menus and the “Simple by default” backgrounds.
The “Black Mirror with video in top 1/3 of screen”, is the simplest one because it already includes the video and audio of the video, so by selecting this template you have nothing to do. Simply play the video preview on the right hand side to check that you’re happy with it. By default the video is played from the very beginning but this can be changed. See the customization steps below.
The “Simple by default” menu enables a video to be added but no audio
All the “Glossy” template types enable to add video and audio.
To cutomize the background of the ROOT menu:
1. Select right menu type as indicated above
2. In the treeview, underneath your titleset, click on "Root menu parameters" and click on "background video/image for root menu..."
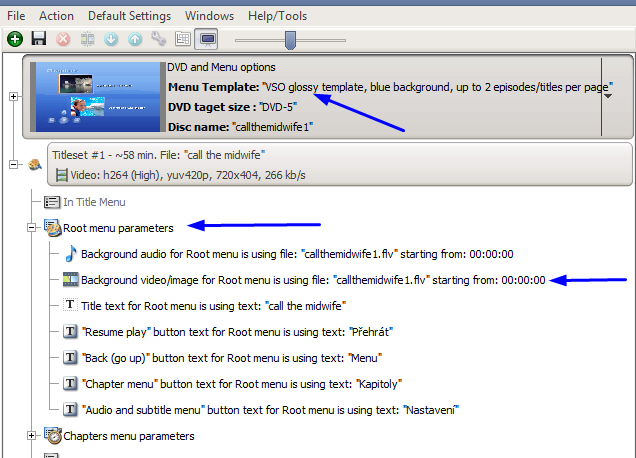
This opens a window where you need to click on "use a custom file". A browser will open where you will be able to search and load your video/image. Since you’ll certainly want to add the video that is in your project, you still need to select it there.

If you load a video that has an audio, you will be asked if you want to keep the audio (except for CX8 titles and Simple backgrounds who do not allow audio). If you do, it will be played with the video in the background of the menu
Other customization possibilities:
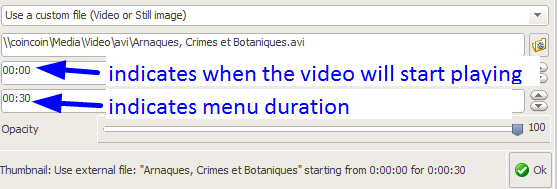
You can also decide not to play the video from the beginning (so you can select a specific scene from the video or if the movie starts with credits or an intro and you don't want this to be in the background). In Starting time indicate the start time where the video should be played from.
By default the Menu duration is set to 30 seconds but you can change that duration. If your video or audio file is not as long as the menu duration set, it will loop.
You can have the background video or image appear with more or less opacity if needed, depending which you can edit thanks to the "opacity slider". Click on "OK" and you will see the result live in the preview on the right, just click on the "play" icon.
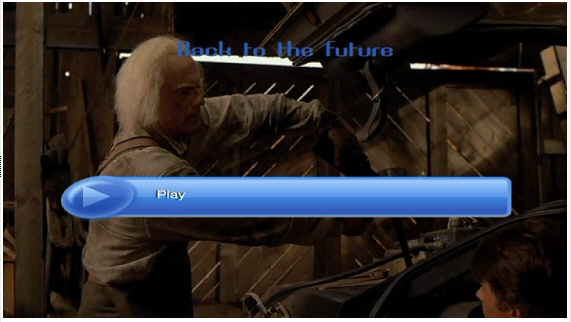
For instance:
2. Projects with more than one video.
If you only have one video in your project then you will need to customize the TITLE menu. That is the first menu shown when inserting the DVD as it enables selection of the different titles that are on the projects.
Templates that enable Title menu customization:
All the “Black Mirror” background types
Classic, simple but elegant
Image Wall
Minimal
The “CX 8 titles” and the “Simple by default” only allow to add video or image but contain no audio
To cutomize the background of the TITLE menu:
1. Select right menu type as indicated above
2. In the treeview, underneath the menu selection and above your titlesets, click on "Title menu parameters" and click on "background video/image for title menu..."
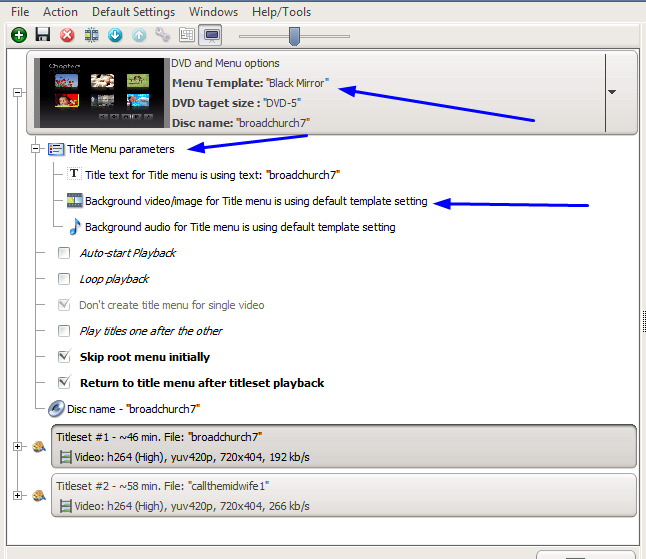
This opens a window where you need to click on "use a custom file". A browser will open where you will be able to search and load your video/image. Since you’ll certainly want to add the video that is in your project, you still need to select it there.

If you load a video that has an audio, you will be asked if you want to keep the audio (except for CX8 titles and Simple backgrounds who do not allow audio). If you do, it will be played with the video in the background of the menu
You can also decide not to play the video from the beginning (so you can select a specific scene from the video or if the movie starts with credits or an intro and you don't want this to be in the background). In Starting time indicate the start time where the video should be played from.
You can have the background video or image appear with more or less opacity if needed, depending which you can edit thanks to the "opacity slider". Click on "OK" and you will see the result live in the preview on the right, just click on the "play" icon.
For instance:
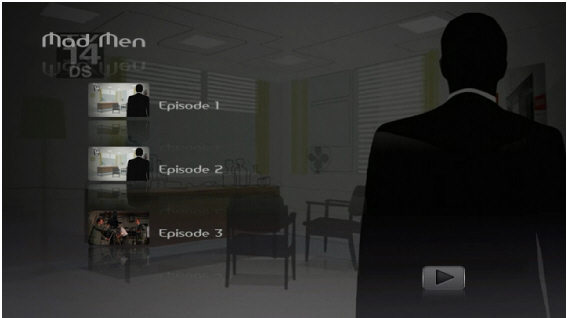
Additional info:
-Make sure the option "Auto-start playback" isn't checked in the menu options, or your menu will be skipped when inserting the DVD and the video will be played straightaway.
-To know more about DVD menus and other customization possibilities, read our complete manual:http://www.vso-software.fr/guides/cxd/cxd-menus.php
ConvertXtoDVD offers some great customization possibilities, like adding a video, picture and audio to your DVD menu. This makes your DVD not only pretty cool and unique, but very professional too!
ConvertXtoDVD offers more than 12 different menu templates, but only a few of them enables for this kind of customization. Simply follow these steps and you’ll soon be the king (or queen ) or cutom DVD menus!
The only trick is to determine which menu type will need to be customized according to your type of projects.
1. Projects with only one video.
If you only have one video in your project then you will need to customize the ROOT menu. That is the first menu shown when inserting the DVD.
You need to select between the “Black Mirror with video in top 1/3 of screen”, the “Glossy” menus and the “Simple by default” backgrounds.
The “Black Mirror with video in top 1/3 of screen”, is the simplest one because it already includes the video and audio of the video, so by selecting this template you have nothing to do. Simply play the video preview on the right hand side to check that you’re happy with it. By default the video is played from the very beginning but this can be changed. See the customization steps below.
The “Simple by default” menu enables a video to be added but no audio
All the “Glossy” template types enable to add video and audio.
To cutomize the background of the ROOT menu:
1. Select right menu type as indicated above
2. In the treeview, underneath your titleset, click on "Root menu parameters" and click on "background video/image for root menu..."

This opens a window where you need to click on "use a custom file". A browser will open where you will be able to search and load your video/image. Since you’ll certainly want to add the video that is in your project, you still need to select it there.

If you load a video that has an audio, you will be asked if you want to keep the audio (except for CX8 titles and Simple backgrounds who do not allow audio). If you do, it will be played with the video in the background of the menu
Other customization possibilities:

You can also decide not to play the video from the beginning (so you can select a specific scene from the video or if the movie starts with credits or an intro and you don't want this to be in the background). In Starting time indicate the start time where the video should be played from.
By default the Menu duration is set to 30 seconds but you can change that duration. If your video or audio file is not as long as the menu duration set, it will loop.
You can have the background video or image appear with more or less opacity if needed, depending which you can edit thanks to the "opacity slider". Click on "OK" and you will see the result live in the preview on the right, just click on the "play" icon.
For instance:

2. Projects with more than one video.
If you only have one video in your project then you will need to customize the TITLE menu. That is the first menu shown when inserting the DVD as it enables selection of the different titles that are on the projects.
Templates that enable Title menu customization:
All the “Black Mirror” background types
Classic, simple but elegant
Image Wall
Minimal
The “CX 8 titles” and the “Simple by default” only allow to add video or image but contain no audio
To cutomize the background of the TITLE menu:
1. Select right menu type as indicated above
2. In the treeview, underneath the menu selection and above your titlesets, click on "Title menu parameters" and click on "background video/image for title menu..."

This opens a window where you need to click on "use a custom file". A browser will open where you will be able to search and load your video/image. Since you’ll certainly want to add the video that is in your project, you still need to select it there.

If you load a video that has an audio, you will be asked if you want to keep the audio (except for CX8 titles and Simple backgrounds who do not allow audio). If you do, it will be played with the video in the background of the menu
You can also decide not to play the video from the beginning (so you can select a specific scene from the video or if the movie starts with credits or an intro and you don't want this to be in the background). In Starting time indicate the start time where the video should be played from.
You can have the background video or image appear with more or less opacity if needed, depending which you can edit thanks to the "opacity slider". Click on "OK" and you will see the result live in the preview on the right, just click on the "play" icon.
For instance:

Additional info:
-Make sure the option "Auto-start playback" isn't checked in the menu options, or your menu will be skipped when inserting the DVD and the video will be played straightaway.
-To know more about DVD menus and other customization possibilities, read our complete manual:http://www.vso-software.fr/guides/cxd/cxd-menus.php