How to adjust the sound of your videos?
Posted: Tue Feb 24, 2015 3:19 pm
If you come across videos with a bad sound that is too low or too high or if you’re hearing impaired and need to set a high volume to be able to enjoy your videos, then use our new audio normalization feature! It’s all automatic, all you have to do is to click on one button, and let the magic work
The new feature is available in the following programs, for now: ConvertXtoVideo, Blu-ray Converter Ultimate and DVD Converter.
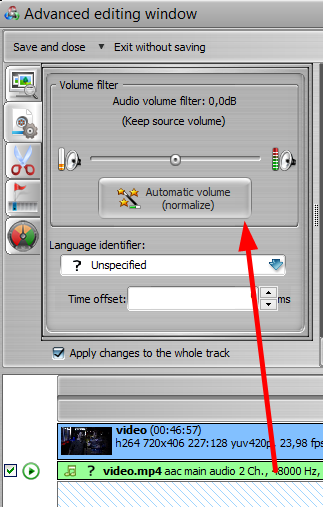
1. If you need to set the audio volume for one video only, insert the video, then click on “advanced Edit” to open the editing window. There you can check the audio volume by playing the video with the built-in player. If you’re not happy with it, then click anywhere on the green audio track in the timeline at the bottom. This will open the audio editing window at the top left hand side (see screenshot below). There you can set the volume level of your choice , or click on the button below with the magic wand and this will automatically set the audio at the required volume level. You’re done, you can leave the window by clicking “save and close” at the top, and then “convert”.


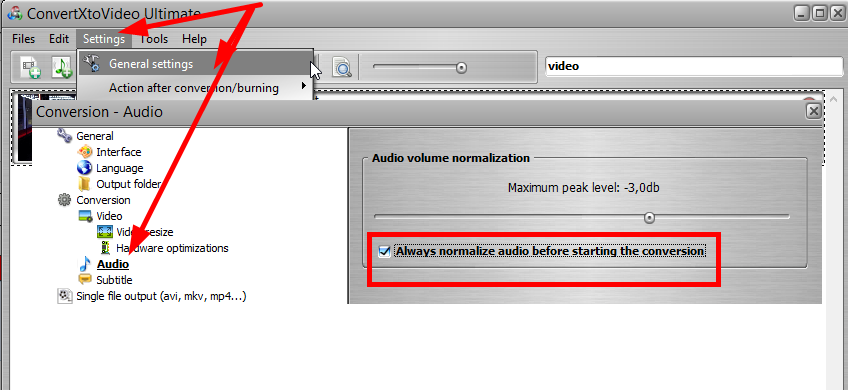
2. If you want to set the audio volume for all your videos, then you can set the “audio normalizator” once and for all. Then go to “Settings” “General Settings” “ Conversion” and “Audio”
On the right hand side you will see the audio volume normalization slider . If you are hard of hearing, we advise to set the volume at the highest possible level. Then click on “Always normalize audio before starting the conversion”, and you’re all set.
Everytime you’ll convert a video, the automatic wizard will set the volume to the desired intensity before conversion.

NB: you need to convert the video after setting the audio volume. Any editing done within the software is only applied during conversion.
The new feature is available in the following programs, for now: ConvertXtoVideo, Blu-ray Converter Ultimate and DVD Converter.
1. If you need to set the audio volume for one video only, insert the video, then click on “advanced Edit” to open the editing window. There you can check the audio volume by playing the video with the built-in player. If you’re not happy with it, then click anywhere on the green audio track in the timeline at the bottom. This will open the audio editing window at the top left hand side (see screenshot below). There you can set the volume level of your choice , or click on the button below with the magic wand and this will automatically set the audio at the required volume level. You’re done, you can leave the window by clicking “save and close” at the top, and then “convert”.


2. If you want to set the audio volume for all your videos, then you can set the “audio normalizator” once and for all. Then go to “Settings” “General Settings” “ Conversion” and “Audio”
On the right hand side you will see the audio volume normalization slider . If you are hard of hearing, we advise to set the volume at the highest possible level. Then click on “Always normalize audio before starting the conversion”, and you’re all set.
Everytime you’ll convert a video, the automatic wizard will set the volume to the desired intensity before conversion.

NB: you need to convert the video after setting the audio volume. Any editing done within the software is only applied during conversion.