Combine videos and pics together
Posted: Wed Feb 24, 2016 3:16 pm
With the new ConvertXtoVideo 2, you can now combine photos AND videos together to make great slideshows!
Here is how to do this:
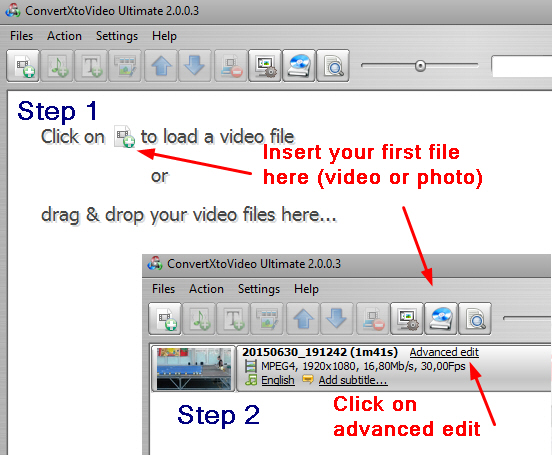
1. Insert your first file in the software (photo or video). Then, once the file is loaded, click on “Advanced Edit”

2. The editing window opens: now you’ll need to add the other files to the first one, with the “merge” function.
3. You will need to insert each file one by one, always by clicking on the same button: at the bottom of the window you see the project structure on the right, the merge button you need to click on : a green circle with a white arrow (Warning: the order in which you add the files cannot be changed, once added, the files cannot be “moved around”)

4. You can edit the display duration of the picture by moving the slider on the side of the picture. (By default, the photos are displayed for 5 seconds)

5. To add audio to the slideshow, you have 2 options:
-add an audio that will play over the whole project (if it’s long enough). In that case, the audio from videos inserted will not be heard. To do this, add the audio file by using the musical note icon at the bottom of the software. You can add as many audio as you want to cover the whole slideshow duration if necessary.


-add an audio only over pictures, if you have videos inside your project. In that case the audio will only play during the photo display and whenever the slideshow switches to a video, it will be the videos’ audio track that will be heard. To do this you must use the “drag and drop” to insert the audio: drag the audio and drop it under the picture (if you have added a few pictures one after the other, make sure you release your mouse under the first picture of the lot)

6; Check the result on the above preview, then click on “Save and close” at the top
7. Select the output format and click on "Start" to start the conversion
Here is how to do this:
1. Insert your first file in the software (photo or video). Then, once the file is loaded, click on “Advanced Edit”

2. The editing window opens: now you’ll need to add the other files to the first one, with the “merge” function.
3. You will need to insert each file one by one, always by clicking on the same button: at the bottom of the window you see the project structure on the right, the merge button you need to click on : a green circle with a white arrow (Warning: the order in which you add the files cannot be changed, once added, the files cannot be “moved around”)

4. You can edit the display duration of the picture by moving the slider on the side of the picture. (By default, the photos are displayed for 5 seconds)

5. To add audio to the slideshow, you have 2 options:
-add an audio that will play over the whole project (if it’s long enough). In that case, the audio from videos inserted will not be heard. To do this, add the audio file by using the musical note icon at the bottom of the software. You can add as many audio as you want to cover the whole slideshow duration if necessary.


-add an audio only over pictures, if you have videos inside your project. In that case the audio will only play during the photo display and whenever the slideshow switches to a video, it will be the videos’ audio track that will be heard. To do this you must use the “drag and drop” to insert the audio: drag the audio and drop it under the picture (if you have added a few pictures one after the other, make sure you release your mouse under the first picture of the lot)

6; Check the result on the above preview, then click on “Save and close” at the top
7. Select the output format and click on "Start" to start the conversion